
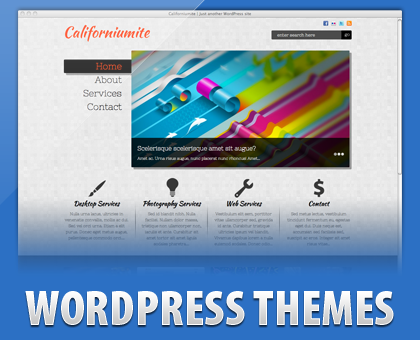
Ever wanted to showcase your works and portfolio in a trendy manner? Check out our latest portfolio theme –Californiumite WordPress Theme!
With crisp custom typography, stylish background patterns, fancy jQuery slider and custom front page widgets, you can’t go wrong with Californiumite!
It has ample space to showcase your works. Californiumite WordPress theme also comes with multiplebackground color options. This theme instantly transforms your basic WordPress blog into a stunning portfolio website!
Like our other freemium themes, Californiumite is also tried and tested to work in a multisite environment. Californiumite is WordPress MU compatible theme. A clean and well-structured .pot file is also included so that you can translate the theme to your preferred languages with ease.
Californiumite WordPress theme is an awesome WordPress theme which is great for any blogger who wants to impress their readers with their contents and a premium quality design blog at no cost!
Check out Californiumite WordPress theme features:
- Portfolio theme
- WordPress MU Compatible
- Trendy Pixel Design
- Jquery Slider
- Multiple Background Color
- Custom Font Integration
- Spread the articles via Social bookmarks (TweetMeme, Delicious, Digg, Newsvine, RSS, Stumbleupon, Technorati, Twitter)
- Separation of Comments and Trackbacks
- SEO optimized
- Automatic Thumbnail Resizer (without using a custom field)
- Compatible with WordPress version 3.3+
- RSS, Twitter, Facebook and Flickr subscription
- Google Analytics code integration
- Built-in Page Navigation
- Advertisement Blocks Ready
- Gravatar Enabled
Installation:
- Install californiumite folder at /wp-content/themes/
- Activate Californiumite Theme 1.0 by Padd Solutions (Note: Don’t worry if it might look disoriented at first, you need to activate the required plugins to fully utilize the theme.)
Activate the Required Plugins:
- Regenerate Thumbnails
- WordPress Popular Posts
Initial Settings:
- Regenerate Thumbnails (skip this step if you are on a fresh install):
- Tools > Regen. Thumbnails
- Click Regenerate All Thumbnails
- Wait for 100% to regenerate all thumbnails.
- Setting the Menus:
- Go to Appearance > Menus.
- Drag and drop the menus you want to appear in header navigation menu at the “Main Menu” and hit “Save Menu” button.
- At the Theme Locations box, choose “Main Menu” from the dropdown choices and hit “Save”.
Customizing Californiumite Theme:
- Setting the Custom Front Page Widgets:
- Go Appearance > Californiumite Options > General tab
- First Column Page > Choose the page from the dropdown menu
- Second Column Page > Choose the page from the dropdown menu
- Third Column Page > Choose the page from the dropdown menu
- Forth Column Page > Choose the page from the dropdown menu
- Save Settings
- Setting the Gallery Category:
- Go Appearance > General tab
- Designate Gallery Category from the dropdown choices
- Save Settings
- Setting the Slideshow:
- Go Appearance > Slideshow tab
- Enable Slideshow
- Designate Slideshow Category from the dropdown choices
- Customize the Slideshow Effects, Slide Duration and Slide Scroll Speed
- Save Settings
- Setting the post thumbnail:
- Go Post > All Posts > Choose the post to edit
- From the post section, find the “Featured Image” box found at the lower right most part of the screen
- Set Featured Image (recommended image size: 727×389)
- Publish / Update Post
- Customize the Background Color:
- Go Appearance > General tab
- Use the color picker for your background color options.
- Save Settings
Requirements:
- WordPress 3.3+
- Host server with PHP5+


