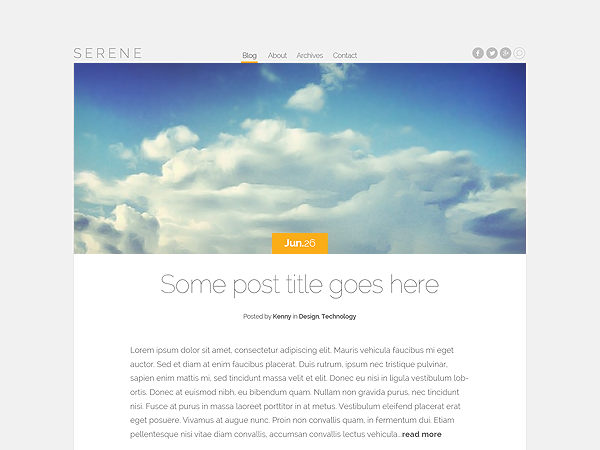
Serene is a truly beautiful blogging theme with post format support. The design’s elegance stems from its simplistic and spacious design. Browsing the theme is easy on the eyes and on the mind, each new post arriving like a breath of fresh air.
Elegantly Designed
Serene is a simple, modern theme built with design in mind. We wanted to create a blogging theme that is a pleasure to read.
Secure and Valid Code
Our themes use coding best practices to insure that they are fast and secure. Our themes are W3C compliant and undergo frequent security audits.
Browser Compatibility
We insure that all of our themes are compatible with the most popular internet browsers. It’s important that your website performs well for everyone who visits it.
Post Formats
Serene supports 6 different post formats, including: Article, Quote, Video, Audio, Gallery and Link. Now you can create a truly engaging blog using beautiful post variations.
Unlimited Colors
Using the Theme Customizer and Custom Color Options, the possibilities are endless!
Unparalleled Support
We put a ton of effort into providing top-notch tech support to all of our users. With our dedicated support staff at your back, you can be sure that you will have your blog up and running without a hitch no matter what your experience level is.


How To Use This Theme
Using Serene Is Easy. Please Follow These Instructions.
1. Adjusting The Overal Layout – You can adjust the theme’s case colors via the Theme Customizer. Once the theme has been enabled, click the Appearances > Customizer link to open the customizer options. Under the “Theme Settings” section, you can adjust the highlight color. The default is Orange.
2. Adjusting Individual Post Colors – You can also adjust the font and background colors of each post you create. When you create a new post, locate the “Post Settings” box below the text editor. Here you will see options for “Background Color” and “Post Text Color.” If you choose a dark background color, then you should set your “Post Text Color” to Light. For example, in the following post we have the Background Color set to #507c90 and the Post Text Color set to “Light.”
Using Post Formats
1. Standard – A standard blog post does not contain any media elements other than the post text and an image. You can define a header image using the “Featured Image” box to “Set featured image.”
2. Video – When the Video format is selected, a video is embedded into the header of the post and is played when the visitor clicks the play icon. To add a video post, select the “Video” format and then simply add a link to a Youtube or Vimeo video in your post. The theme will automatically grab the first video you like to and use it in the header.
3. Audio – When the audio format is selected, the post displays a custom audio player interface that can play a single audio file. To create an Audio post, select the “Audio” post format and then use the “Add Media” link above the post editor to embed an audio file into your post. The theme will automatically use the first audio file embedded in your post within the post’s header.
4. Quote – The Quote post format takes the first block quote from your post and display it in your post’s header. To create a quote post, select the “Quote” post format and then add a “block quote” to your post. The first block quote in your post will be used in the header.
5. Gallery – A gallery post will display a gallery of images within a slider in your post’s header. To create a gallery post, select the “Gallery” post format, and then use the “Add Media” button above the post editor to add a new gallery to your post. The first gallery added to your post will automatically be used in the header of your post.
6. Link – A link post is used for sharing a link, and it will display your link/link title in the header of the post. To create a link post, select the “Link” post format and then add a new link to the body of your post. The first link in your post will be pulled into the header and featured.
Configuring Social Media Icons
You can configure the social media buttons via the Appearances > Customizer panel. Once opened, look for the “Theme Settings” section and fill in the URL options for each profile. To disable the links, simply leave each field blank.


